Connector activation
A prerequisite for the deployment of the Connector is that the company has a Maventa account and the invoicing software is able to create XML data in one of the formats approved by Maventa. The Connector is downloaded either locally to a computer or to a server, and the Connector is logged into with Maventa's user ID.
You can find the Maventa Connector documentation here.
1. Getting Started
-
Ensure that your company has a Maventa account.
-
Using the invoicing software, create invoices in an XML format that Maventa supports, and save them to the OUT folder.
-
You can also download the Maventa Connector user manual (PDF) for your assistance here.
2. Connector Installation and Login
-
Download the Connector to a local computer or server. Download the Maventa Connector here.
-
Log in to the Connector with your Maventa user IDs.
3. Sending Invoices
-
Create an OUT folder for sales invoices and move the invoices there from the invoicing software.
-
Set the Connector to monitor the OUT folder. It will transfer the invoices to the Maventa account, from where they will be delivered onwards.
4. Receiving Invoices
-
Define an IN folder for purchase invoices. The Connector brings incoming invoices here at the interval defined in the reception timer.
-
The invoicing software retrieves the received invoices from the IN folder.
5. Sending and Receiving Attachments
-
Package the invoice and attachments into a zip file and save to the OUT folder.
-
The invoice's .xml file is the invoice itself, the .pdf is the invoice image, and all other files are attachments. In automatic sending, the content of the ZIP file could be, for example: invoice1001.xml, invoice1001.pdf, attachment1.pdf
-
Received attachments arrive in PDF format in the IN folder.
6. Monitoring Log Information
-
Monitor the Connector's log regularly to find and resolve possible errors. The Connector's log should be monitored regularly from the log tab.
-
Error messages appear in the log, for example, in cases where an invoice is not successfully transferred from the Connector to Maventa.
-
With the Microsoft Event Viewer program, set notifications to email if you want to know about errors that appear in the logs.
7. Installing the Connector on multiple different workstations
(one Connector per workstation)
-
If the Connector is installed for multiple users locally on workstations, all users must have their own Maventa login credentials with which to log in to the Connector.
-
Settings are then defined separately for each Connector, so that each workstation has, for example, its own OUT folder defined for outgoing invoices.
8. Changing the Connector's language
The Connector's language cannot be changed directly from the user interface.
-
Select the language again either by deleting the settings file (config.xml) or by editing it.
-
Search for the settings file config.xml from the Connector's files on the computer (usually saves to the ProgramData location.)
-
Delete config.xml and then redefine the settings in the Connector. The Connector will then ask you to redefine the language on the first startup.
What protocol and port does the Connector use?
HTTPS, port 443. The Connector uses a normal HTTPS call, just like a browser.
To what address does the Connector connect?
secure.maventa.com behind which are several IP addresses.
Where can proxy settings be entered?
The Connector does not have separate proxy support.
Can the Connector be installed on a server?
Yes, it can. In that case, however, it is recommended to monitor the log for errors.
Keywords: Maventa, Connector, sales invoice, purchase invoice, attachments, XML, local installation, log, ZIP.
Connector and .NET Framework
1. Ensure that .NET Framework 2.0 is installed:
-
The Connector uses the framework 2.0 version on the Windows operating system.
-
Check during installation that .NET Framework 2.0 is installed.
2. Check the .NET Framework 3.5 version:
-
Note that .NET Framework 3.5 includes 2.0 and 3.0.
3. Install .NET Framework 3.5 if necessary:
-
Follow Microsoft's English installation instructions if you need help installing .NET Framework 3.5: Microsoft .NET Framework 3.5 installation instructions.
For older Windows version users:
If you get the error "Not enough disk space" during installation, download the updated version instead of the normal installation file.
Maventa Connector does not install or crashes when starting
Contact the support for your computer system and ask for admin rights for the installation and use of the Maventa Connector.
-
Ensure that you are using the latest version of the Maventa Connector. You can download and install the latest version from Maventa's home page.
-
Try deleting the settings file and redefining the settings. First, shut down the Connector completely from the Windows Task Manager and then delete the settings file. The location of the settings file (config.xml) depends slightly on the Windows version:
Vista and Windows : C:\ProgramData\Maventa Connector
-
If you cannot find the file in question, the folder may be hidden. With the help of this "File Explorer in Windows" guide, you can make hidden files and folders visible.
-
After this, try to restart the Connector. Please note that settings must always be defined and saved after deleting the settings file or the program.
Managing several companies in the Connector
Ensure that all managed companies use the same user ID with which you log in to the Maventa Connector.
New companies appear in the company list on the right side of the Connector view when you use the Maventa Connector by logging in again.
Edit the settings for each company separately and remember to save the changes.
You can set companies to online or offline status individually, depending on which companies you want to keep active.

Connector's Test environment
In this guide, you will learn how you can test the transfer of invoices from the Connector to Maventa, so you can see the behavior of the invoices before actual invoicing.
-
Register a Test Account:
Create a test account for Maventa at https://testing.maventa.com/login. This account imitates a normal Maventa environment.
-
Download Connector:
If you do not have the Connector yet, download it. From the program, you can access both the test and production side by selecting from the drop-down menu in the login window.
-
Define Settings:
Log in to the test side with the credentials of Maventa's test account. Define the Connector's settings, such as the OUT folder to which the invoices are transferred.
-
Test Invoices:
Create test invoices with the program and move them to the OUT folder. The Connector transfers the invoices to Maventa's test account automatically. The Connector's automatic sending monitors the folder at regular intervals and transfers the invoices to Maventa's test account.
-
Monitoring:
Check the events from the Log tab.
-
Note on Invoice Sending:
Invoices sent in Maventa's test environment do not proceed, except for email invoices, if this option is allowed. For testing, use your own email or prevent the sending of email invoices from the settings of the Maventa test account under Settings -> Sending invoices -> Sending invoice by email -> Do not send invoice by email.
-
Moving to Production:
If the test environment works flawlessly, register a production account at https://secure.maventa.com/login and log in to the production side.
Sending TEAPPS invoices and attachments in the Connector
This guide explains how to send single or multiple TEAPPS invoices as well as their PDF images and attachments with the help of the Maventa Connector.1. Multiple TEAPPS invoices in the same file:
-
Place all invoices into one TEAPPS XML file.
-
Move the XML file and the PDF images of the invoices at once to the Connector's OUT folder.
-
The XML material links the correct invoice to the image and attachments.
2. Single TEAPPS invoice:
-
Package the XML file, PDF image, and attachments of a single invoice into a zip folder.
-
The file names of the zip folder do not matter.
-
Move the zip folder to the Connector's OUT folder.
The XML material refers to the correct image and attachments for each invoice, ensuring the correct linking.
Attachments
You can send attachments with the help of the Connector in two ways. Please note that section 1. The manual sending method Works only with Finvoice-formatted invoices. See section 2. if you are sending invoices in another format.:
1. Manual sending method
Send the invoices manually with the "Manual sending" button, where the invoice's XML file is first selected and after that, the attachments.
After the XML file, the invoice image is first asked for separately, if it does not exist, the step can be skipped by pressing 'cancel' and after this, possible attachments are selected:
-
A window will first open for you:
Do you want to add attachments to the invoice?
-
Select : Yes
Select the invoice's PDF or skip by pressing "Cancel"
-
At this point, you can select the invoice's PDF image or press cancel/cancel if you do not want to add the invoice's PDF image.
Next, a window will open:
Select one or more attachments or skip by pressing "Cancel"
-
At this point, you can always add the invoice's attachments.
2. Automatic sending
You can send the invoices with automatic sending, so that the invoice is packaged into a zip file and saved normally to the Out folder.
In the packaged zip file, the XML file is the invoice itself, the .pdf with the same name is the invoice's image, and all other files are attachments.
For example, the content of the zip file could be: invoice1001.xml, invoice1001.pdf, attachment1.pdf.
Automatic sending does not work
-
If you have selected an OUT folder for the company and set the company to ONLINE status, when you press "Start service", a message should appear in the log "Monitoring folder ..... for company ...."
The Connector's automatic sending is active.
-
If the message instead is: "OUT folder does not exist", the reason is that the OUT folder is on a network drive and the Connector service is run with a local ID that does not have access to the network drive. Note! This is a different thing than the logged-in user.
Check that the folder structure of the monitored folder is correct, i.e., that the last folder is named "Out".
The user running the Connector service can be changed from Windows service management (Start/Run 'services.msc'). By default, the user is "Local System Account" and that should be changed to one that has full rights to the folders on the network drive.
Sending own PDF invoice image in the Connector
1. Check the sending format (automatic sending):
-
If the invoice is sent as an e-invoice, ensure that the Connector's sending format is set correctly.
-
If you are using finvoice but sending several invoices in one XML file, use the finvoice multiple format. Note that attachments cannot be sent in this format.
2. Manual sending:
-
During sending, a view first opens: "Do you want to add attachments to the invoice?".
- Select "Yes".
-
Select the invoice's PDF in the correct step:
- Select the invoice's PDF image in the step "Select the invoice's PDF or skip by pressing 'Cancel' ".
- Press cancel/cancel if you do not want to add the invoice's PDF image. -
Add attachments in the step "Select one or more attachments or skip by pressing 'Cancel' ".
3. Invoices to be sent via the printing service:
-
Ensure that the use of your own invoice images in printouts has been activated from your Maventa account settings.
-
Instructions for activating the setting:
log in to your Maventa account and select Settings -> Invoice settings > Sending invoices -> Printing service -> Use your own invoice image in printable invoices.
Downloading the latest Maventa Connector version
You can download the latest Connector version directly from Maventa's documentation. Before downloading, please make sure that you have completed the above steps.
Before installation
Removing an old version:
Make sure you remove the old version of Connector before installing a new one. Connector can be installed in two different locations: ProgramFiles and ProgramData. Check both locations and delete all old files.
Checking the configuration file:
The old configuration file of the Connector (config.xml), located in the ProgramData folder, may remain in the system and affect the new installation. Remember to delete this file if you do not want the new Connector to use the old settings.
Handling the error message during installation
If you receive the error message "Error 1001. Service already exists" during installation, please follow these steps to perform a manual removal:
1. Opening up the service management
- Search your workstation Windows Services Management OR
- Open the command prompt and type the command as administrator:
- Press the Windows key, type "cmd" and press Enter, or
- open the Menu by pressing Windows, search for "Command Prompt" or "Command Prompt" and click to open.
- Type command services.msc and press Enter.
2. Stopping the service
- Search for "Maventa Connector Service" from the list.
- If the service is running, stop it by clicking on the name and selecting "Stop service".
3. Deleting the service
- Reopen the command line as administrator.
- Enter the command: sc DELETE MaventaService
- If you are using PowerShell, the command is sc.exe delete MaventaService
4. Restarting the system
- Restart your computer.
5. Carrying out the installation
- Open the downloaded Connector installation file (maventa-connector-installer-latest.msi).
- Follow the installation instructions that appear.
Following these instructions carefully will ensure that your Maventa Connector installation goes smoothly and that you are up and running with the latest version.
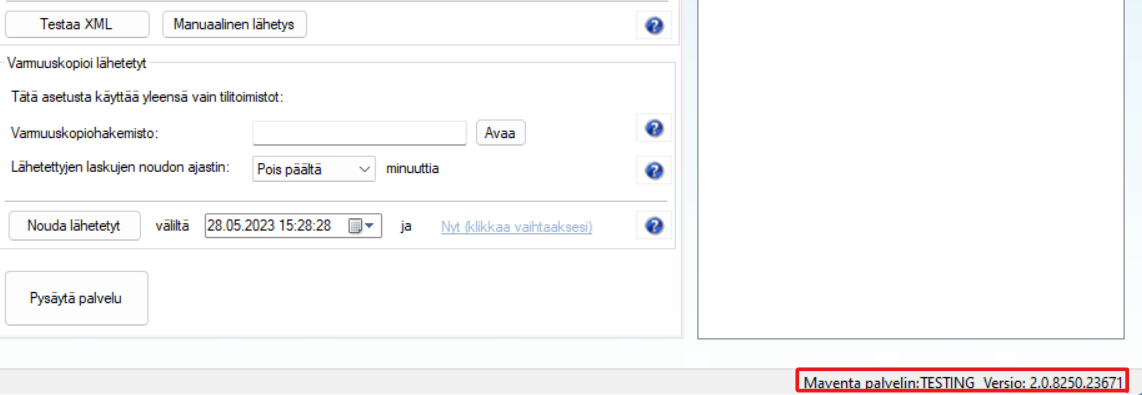
You can find your current version details in the Connector at the bottom right:
Error messages subscription
Receiving notifications of Maventa Connector log errors to email
In this guide, you will learn how to get notified of Maventa Connector log errors via email. This way you always stay up to date on error situations without manually monitoring the log.
Step-by-step instructions:
- Open Windows Event Viewer.
- Select "Maventa" from "Applications and Services Logs..." on the left side.

- Click the error to make it 'active' and select "Attach Task To This Event".
- Give the task a name and description in the "Create a Basic Task" view (e.g., "Error") and select "Next".

- Select the desired action "Send an e-mail" and click "Next".

- Write the necessary information:
- Sender's email address
- Recipient's email address
- Subject and content for the message
- SMTP server
- Click "Next" and finalize the creation of the task.

FAQ
- How do I get error messages to my email?
Define a task through Microsoft Event Viewer that sends an email about errors.
- What information do I need for the email settings?
The sender's and recipient's email addresses, the message's subject and content, and the SMTP server details.
Retrieving invoices from the Connector
If Finvoice invoice filenames do not match:
If you receive invoices in Finvoice format, you can force the filenames of the received invoices to be consistent (i.e., XML and PDF with the same name) by changing the Connector's settings file with a program like Notepad.
The location of the settings file (config.xml) depends slightly on the Windows version:
- Vista and Windows: C:\ProgramData\Maventa Connector
Add the line below in connection with the company's information, e.g., after the "LastRec" element:
- <ConsistentFileNames value="True" />
Note: Other attachments that may come with the invoices will have their original name.
Connector leaves all invoices unretrieved
This section discusses the reasons why the Maventa Connector does not retrieve any invoices at all, and provides instructions for solving the problem.Most often, the failure to retrieve is related to the fact that the Connector does not have access to the IN/IN folder defined in the settings. In this case, an error may be found on the Connector's log tab: IN folder does not exist.
The problem may be due, for example, to the folder being on a network drive and the Connector service being run with a local ID that does not have access to the network drive.
1. Check access to the IN folder:
- Ensure your user's access to the IN folder's location.
- Ensure that the Connector has access to the storage folder.
- Ensure that the folder structure is correct: the last folder is named "In".
2. Ensure user information on the Maventa account:
- Check that the user logged in to the Connector is still found on the Maventa account.
- Ensure that the user is activated on the company's Maventa account. This should be especially taken into account if new users have been added to the account to handle invoicing.
Maventa Connector leaves some invoices unretrieved
This section discusses situations where only some of the invoices are left unretrieved, and provides instructions for solving them.
1. Check the computer or server time:
- Check that the time on the computer or server is correct and updates automatically.
If the problem persists, send the Connector's log file (.txt) and settings file (config.xml) to customer support.
2. Checking the manual retrieval time interval:
- Ensure that the Connector's manual retrieval time interval in the Connector covers the creation times of the unreceived invoices found in Maventa.
- Check the invoice creation times on the Maventa account under Invoices -> Received, and define the time interval accordingly.
Filenames of retrieved invoices and handling of attachments
With the help of the Maventa Connector, invoices can be retrieved in two ways. We recommend discussing with the software vendor which of the two ways is better suited for the software.
-
Invoices are saved to subfolders per invoice
- The name of the subfolder is formed from the company's business ID and invoice number, e.g., 12345678_123.
- Inside the subfolder are the invoice material (.xml), invoice image (.pdf), as well as any attachments.
- The files are named according to the invoice number, e.g., invoice_123.xml & invoice_123.pdf. This setting can be activated by selecting "Save received to subfolders" in the Maventa Connector.
-
Invoices are saved to the same folder (Connector default setting)
- If all invoices are saved to the same folder (IN), the invoice material (.xml) and invoice image (.pdf) + any attachments will automatically have the invoice's unique ID added to the beginning of the filename.
-
For example:
1532affe-7868-48ec-xxxx-8bb4d82exxxx_invoice_1499541.xml, 1532affe-7868-48ec-xxxx-8bb4d82exxxx_invoice_1499541.pdf and 1532affe-7868-48ec-xxxx-8bb4d82exxxx_attachment_1499541.pdf.
Stopping the retrieval of incoming invoices
In this guide, you will learn how to prevent the retrieval of purchase invoices in the Connector software. The steps include switching off the reception timer, saving the settings, and restarting the service.
- Go to the Connector's settings and select "Reception timer" under "Off".
- Save the changes by selecting "File" -> "Save settings" from the top left corner.
- Restart the service: select "Stop service", then "Start service".
- Check from the Log tab that there are no longer any entries about the retrieval of purchase invoices in the log. Specifically, look for entries "Checking for new invoices for company xxx" and "Retrieving invoice xxx from sender xxx...". The absence of these means that the reception timer has been switched off.
Note: Disabling the reception timer does not affect the reception of invoices on your Maventa account. If you want to close the reception of invoices on the Maventa account, proceed in Maventa's settings: "Settings" -> "Company settings" -> "Invoice reception".
Increasing the log size
Through the Windows Event Viewer program, you can go and increase the size of the Connector's log file and select whether the log is overwritten. From Event Viewer, you can find all of the Connector's log information, including those that do not appear directly from the Connector.
- Open Event Viewer
- Select Maventa from the left side (found under "Applications and Services...") and right-click with the mouse. Select "properties" from the menu that opens.
- In the window that opens, increase the log file size (maximum log size), and turn off log overwriting by selecting "Do not overwrite events (clear log manually)".

If you need more extensive log information from a past time, all log information should be found daily from the location
%CommonApplicationData%/Maventa Connector/log _yyyy_dd.txt.
Email report on the number of invoices
From your Maventa account, you can order a short report on your e-invoice account's invoice counts to email under Settings -> Company information -> Email reports:

In the email address field, you can enter several addresses separated by a comma.
In addition, you can select how often the report is sent to you. The options are daily, weekly, monthly.
Ordering an email report is a good choice if monitoring the Connector's log regularly is not possible.
With the help of the email report, you can compare the number of invoices sent from your invoicing software to the number of invoices actually received for sending on the Maventa account according to the email report. If there are discrepancies in these numbers, the Connector's log should be checked for a possible error message.
Changing the user running the service
The Connector service can only be run with the rights of a local Windows administrator.
If you do not want to give the Windows user administrator rights everywhere, you can change the user running the Connector application by following the instructions below:
- Go to Windows Service Manager to change the user running the service
- Start/Run 'services.msc', by default the user is "Local System Account"
- Note that the user must be one that has full rights to the Connector's installation folder and the folders it monitors.
Error messages
In this guide, you will learn to identify and correct error situations related to the use of the Connector. The goal is to succeed in sending the invoice package and to ensure that the folder structures are correct.
Error: The remote name could not be resolved: 'secure.maventa.com'
The error message that appeared in the Connector's log means that the Connector cannot connect to Maventa. This is usually due to a network connection failure or another network-related problem.
If the said entry appears in the log, you can check whether the sending of the invoice package to Maventa was successful or unsuccessful by the following means:
- Check whether an entry for the package still appeared in the Connector's log after the error message: Information, [TestiYritys ...] File --- sent successfully, invoice(s) created.
This entry indicates that the sending was successful.
If the sending of the invoice package was successful, the log might then look more specifically like this:
3.6.2019 15:00:01, Information, [TestiYritys ...] Found file C:\Maventa\TestiYritys\Out\finvoice_2019-06-03_testilaskupaketti1.xml
3.6.2019 15:00:01, Information, [TestiYritys ...] File finvoice_2019-06-03_testilaskupaketti1.xml sent...
3.6.2019 15:00:01, Information, [TestiYritys ...] File finvoice_2019-06-03_testilaskupaketti1.xml sent successfully, invoice(s) created - If the sending of the invoice package was unsuccessful, the log might then look more specifically like this:
3.6.2019 15:21:01,Information, [TestiYritys ...] Found file C:\Maventa\TestiYritys\Out\finvoice_2019-06-03_testilaskupaketti1.xml
3.6.2019 15:21:02,Information, [TestiYritys ...] File finvoice_2019-06-03_testilaskupaketti1.xml sent...
3.6.2019 15:21:56, Error, [TestiYritys ...] Error sending file finvoice_2019-06-03_testilaskupaketti1.xml: The remote name could not be resolved: 'secure.maventa.com '
If the sending appears to have been unsuccessful, also check that the failed package has moved to the Archive folder and is no longer in the OUT folder. This ensures that the package is not sent twice when you move the invoice package back to the OUT folder. - Additionally, you can log in to Maventa and check under Invoices -> Sent whether the invoices in the package have been successfully transferred to Maventa
Error: Object reference not set to an instance of an object
-
[ERROR] Error: Object reference not set to an instance of an object
-
[ERROR] Exception: Object reference not set to an instance of an object
This error indicates that in the Connector's "Sending: Monitored folder" section, the folder path is in an incorrect format, for example, 'C:\CompanyA\Invoices'.
The last folder in the path should always be "Out", for example, 'C:\CompanyA\Invoices\Out'. Therefore, check that the path for outgoing invoices is in the format x\xxx\xxx\Out, and that the invoices are moved to a folder named "Out".
Note that after changing the settings, they must be saved from: File -> Save settings.
The settings will take effect when the service is restarted.
Invoice Sending Error messages
This guide covers error messages that may occur when you send invoices with the Maventa Connector. Follow these instructions to resolve the errors and continue invoicing.
All errors that occur in the Connector are logged in the Connector's log. You can filter the log to show only error messages by going to Log -> View: Errors.
If the error you receive is not found in these instructions, or the instructions don't help with the problem, check the following:
-
You have administrator rights for Windows. The user running the Connector service can be changed in Windows Service Manager (Start/Run 'services.msc'). The default user is "Local System Account", and this should be changed to a user with full rights to the folders on the network drive.
-
The directory structure of the monitored directory is correct, meaning the last directory is named "Out".
-
The outgoing folders have an 'archive' subdirectory. In some systems, the Maventa Connector cannot create this folder automatically, so you must add it yourself.
-
The Online light is green for the company, and the service is running.
-
The user account used to log in to the Connector is found on the Maventa account.
Error: FILE OR FILENAME BLANK or FILE IS EMPTY
Check and ensure that the invoice data and the file name are not empty.
Correct the information and save the invoice again to the OUT folder.
Error: FILENAME CONTAINS INVALID CHARACTERS OR IS INVALID TYPE
(ERROR: FILENAME CONTAINS INVALID CHARACTERS, ERROR: FILENAME INSIDE ZIP CONTAINS INVALID CHARACTERS OR IS INVALID TYPE, ERROR: INVALID ZIP FILE)
The file name contains characters that are not allowed, or the file type is not allowed.
- Check the file name and ensure it contains only allowed characters: a-z, 1-9, ., and _.
- Remove spaces, special characters, and the letters å, ä, ö. Ensure that the file name length is no more than 50 characters.
- Use allowed file types: *.pdf, *.doc, *.xls, *.tif, *.jpg, *.gif, *.txt, *.xml, *.xsl, *.html, *.htm.
Error: UNSUPPORTED XML FORMAT
Maventa does not support the invoice format being sent.
Use supported invoice formats: Finvoice (1.2, 1.3, 2.0, 2.01), TeApps, Svefaktura, EHF, UBL 2.0, OIOXML, PeppolBIS, VismaXML, LiinosXML, SI-UBL.
Error: NO XML FILE OR MORE THAN ONE FOUND
The Maventa Connector has not found any XML data to send or has found more than one XML file. The limit is one XML file per ZIP file. Ensure that each ZIP file contains only one XML data file.
Error: INVOICE FILE CANNOT BE OPENED
The process that creates the invoice file is not yet finished or has not yet closed the file, so the Connector cannot open the file at the same time.
Because the problem is related to how the invoicing software generates XML invoices, the issue is resolved by first creating the files in another location and then moving them to the Connector's OUT folder.
Error: INVOICE FAILS VALIDATION
The invoice data is not valid, meaning it does not conform to the rules of the invoice format, and for this reason, the invoice cannot be sent.
You can check the validation error, for example, from your Maventa account under Invoices > Test XML invoice data.
Error: MULTIPLE INVOICES NOT ALLOWED WITH ATTACHMENTS
The Finvoice Multiple format cannot be sent with a manual transmission. In the Connector, the Finvoice format is likely selected, but Finvoice Multiple should be chosen as the transmission format. The Finvoice Multiple transmission format should always be selected if the finvoice file contains more than one invoice.
NOTE! With this selection, you cannot send attachments. Finvoice Multiple must always be sent with an automated function. The data must be saved in the OUT folder, and the Connector will send it automatically. The transmission format must be Finvoice Multiple.
Error: "The operation timed out"
If you receive an error message like the title in the Maventa Connector log when sending invoice packages, for example:
23.2.2016 10:28:24, Error, [xxxxxx...] Error when sending file finvoice_2016-02-23_xxxxx.xml: The operation timed out
The reason is that the invoice data you are sending is so large that the standard 6-minute transmission time is not enough to process the file. The problem is solved by increasing the time to, for example, ten minutes.
Note! Even if an error occurs, the invoices will appear on the company's Maventa account. If you get the error and the invoices do not go through to Maventa, this is not the primary solution.
Increasing the timeout value:
-
Ensure you have the latest Maventa Connector version installed: 2.0.8250.23671.
-
With the latest version installed, enable Windows to show hidden folders.
-
Open the C:\ drive or the drive where Windows is installed.
-
Open the hidden ProgramData folder.
-
Open the Maventa Connector folder.
-
Open the config file with a program like Notepad.
-
Add this line below the Language or LastUser data in the file:
<ClientTimeout value="900000" />For example, the file content might look like this:XML<xml>
<LastEnv value="TESTING" />
<LastApiKey value="a0ac795b-d9ad-4155-a3a1-41d2131cd750" />
<Language value="en" />
<LastUser value="demo@maventa.com" />
<ClientTimeout value="900000" />This value is in milliseconds and sets the timeout to 15 minutes. This might be a bit too long, as the default value is 6 minutes. You can first try 10 minutes, which is 600000 milliseconds.
-
Save the changes and close the file.
-
Restart the Connector.
Now the package will be attempted to be sent for a maximum of 10 minutes or whatever value you chose.
Remember to take a backup of the entire folder, for example, as changes to configuration files are made at your own risk. When the timeout value is increased, it must be taken into account that the package transmission channel is open for a longer time, and the process is running for at least that 10 minutes per package.
Error: UNKNOWN ERROR
This error is most often a temporary malfunction, so we recommend sending the invoice again after a while. If the error persists, contact Maventa customer support.
Error: The IN folder does not exist
When purchase invoice retrieval fails, an error message may appear in the Connector's log: Error, Company ... has activated invoice retrieval but the 'IN-folder' does not exist. The reason for the "'IN-folder' does not exist" message is usually that the IN folder is on a network drive, for example, and the Connector service is run with a local account that does not have access to the network drive. Please check that:
-
The user has access to the IN folder's location.
-
The Connector can access the storage folder you specified (as the problem may be with permissions).
-
The directory structure of the monitored directory is correct, meaning the last directory is named "In".
Keywords: Maventa Connector, Windows Event Viewer, Log, Error message, SMTP server
Closing Connector
Instructions for discontinuing the use of the Connector service range from removing the reception timer to uninstalling the program. It is also possible to cancel the Maventa service with a written notice.
-
Go to the Connector's Settings.
-
Set the reception timer to be out of use.
-
Save the settings to ensure the changes are valid.
-
Uninstall the Connector from every computer on which it is installed.
The Connector has now been discontinued and will no longer process invoices.
Note that removing the Connector does not affect the Maventa service. You can still send and receive e-invoices in Maventa normally.

If you no longer need Maventa, cancel the service with a free-form, written notice to customer service. This must be done by a person with the right to sign the company name or by the Maventa account's main administrator.
Keywords: Connector, Maventa, cancellation, discontinuation, settings, reception timer.